Showing posts with label Vegetables. Show all posts

Saturday, 28 April 2012

Allotment - Kale

Decided to give Kale a go this year as have heard lots of others raving about it, I haven't even tasted it before which may have made more sense before attempting to grow it but when do I ever do things conventionally?


We have 2 varieties to try, one is called 'Dwarf Green Curled' and 'Westland Winter'. I think we got the latter from a magazine as a freebie. 


Like all Brassica's it is pretty straightforward to sow, we sowed 6 no. of the 'Dwarf Green Curled' variety in a plug tray (see below: left of picture) but only require 3 good plants. We have been doing that a lot this year with everything to allow for any failures to germinate or other issues, sowing approximately double what is needed. I will sow another batch of Kale in May to stagger the cropping times a little, next time I will try the other variety and will sow 6 again but needing 4 good plants.


Friday, 6 April 2012

Allotment - Peas

To sow the peas this year we am trying something different. Last year we simply planted the peas out direct, sowing them where they were to grow. This year however I am going by the policy of planting a plant and not a seed (with a few exceptions to this rule...)


The variety we are using is called 'Early Onward' and cropped very well for us last year. We plan on sowing 1 double row which equates to 46 plants overall. The double row will eventually be spaced 6 inches wide and each plant 2 inches apart. 


If you are fond of peas you may wish to sow another, if not two additional double rows. Sowing should then be staggered for a longer cropping period with new sowing's made every 2-3 weeks until the end of July. Each double row should be spaced 24 inches apart which is a reason why we chose to sow only 1. 


We filled 46 2" diameter pots with good quality all purpose compost making sure to compact the compost before sowing. This will mean when it comes to planting them out the root ball will be nice and compact instead of loose which can lead to damaged roots when transplanting. 


Using a dibber, pencil or whatever you have to hand make a hole around 2 inches deep and drop a pea seed into each, backfill and set aside. Germination should occur from 7-10 days.


Allotment - Cauliflower, Brussels Sprouts, Cabbage, Calabrese (Broccoli)

Cauliflower, Brussels Sprouts, Cabbage, Calabrese or as you may better know it as Broccoli are all members of the Brassica family and are sown in much the same way. We had various levels of success in 2011.


Cauliflower


For one reason or another last year our Cauliflower plants were a complete failure. They germinated well and once planted out just failed to progress and establish into strong plants. We never really fully got to the bottom of why they failed but we will give them another go for 2012. The variety we are growing is called 'All The Year Round' which can also be sown later in the year for a spring harvest.


Brussels Sprouts


Brussels Sprouts, love them or hate them (we love them) they are one of those crops that if grown well will reward you with an abundance of veggies. The only downside to growing Sprouts is the time they take to mature, using up valuable land for most of the growing year. We are growing them again this year though, a few less plants this time around, we are aiming for 3 plants. If grown well we should get a good crop of sprouts in time for the Christmas dinner. The variety we have is called 'Evesham Special'.


Cabbage


Probably the most successful of our crops in 2011, the cabbage is a staple in the Irish vegetable growers garden. Due to being left too long before harvest a few heads burst open which can happen apparently to early maturing varieties so the key is to harvest when ready even if needed or not. As above with the Brussels Sprouts we only want 3 strong plants, this does not sound like a lot but for the area of ground required we did not want to sacrifice any other crop. We are not massive cabbage eaters anyway so no need to have 30 heads all maturing at one time. Maybe when we have a bigger garden in the future we will dedicate more space to them. The variety we sowed is called 'Offenham 2 - Flower of Spring'


Calabrese (Broccoli)


The Calabrese plants were coming on very well last year, we took off for a weekend while the plants were still establishing and came back to complete devastation...the rabbits had completely mauled most of our plants but we still had some left. However due to a period of very warm weather the broccoli heads bolted before becoming fully formed, this I later found out was down to a lack of watering during the really hot period. 


We are giving it a go again this year determined not to make the same mistakes. We sowed approx 14 no in total to have a few spares but only need 6 strong plants overall. We sowed two varieties called 'Green Magic' and 'Autumn Green Calabrese'. 


(See tray on bottom of picture above)


Sowing for all the above was done in the exact same way. In a cell tray filled with good quality multi-purpose compost sow 1 seed approx 1/2 an inch deep and backfill with compost. Allow a good watering and cover / set aside to germinate. Make sure to label your tray as the seedlings can look very similar and difficult to figure out later. 


You can of course sow directly where they are to grow or in a seedbed for transplanting at a later date but as the saying goes 'plant a plant, not a seed' If sowing in a seedbed make sure to cover it to prevent the Cabbage Root Fly from laying its eggs at the base of seedlings, the eggs hatch into larvae which burrow down to the roots of the Brassica's damaging the plant (especially seedlings). For Swedes, Turnips and Radish crops the larvae will burrow into the roots themselves ruining the crop.  


I would advise for all the above to sow double what is required to allow for lack of germination, pests and / or any other problems that may occur as it might be too late to do anything about it. You can always give them away to your neighbour if you cannot use them yourself. 

Allotment - Rhubarb

We chose to grow Rhubarb the most difficult way possible, we do love a challenge myself and Laura....


Growing Rhubarb from seed is quite a challenge and was described in a book as 'only do it if you have your heart set on it'. It will probably take 2-3 years of growing and management before we get a decent crop of Rhubarb but what's the rush? 


Traditionally you grow Rhubarb from roots or crowns but not being in any particular hurry we bought the seeds instead, thinking more of the long term project than anything else. 


The plan for the future then would be to propagate new plants from the existing ones or alternatively to sow a new batch every year or two from seed to have fresh growth every couple of years. 


We sowed 6 seeds in a small unheated propagator to allow for any failure to germinate, we ultimately need only 2 plants. Each seed was sown approx an inch deep in multi-purpose compost. I would expect to see germination after 2-3 weeks. The tray was left outdoors as are all my propagator trays this year but with the benefit of additional cover from the elements.


I will provide a picture update when they have germinated....  

Allotment - Pak Choi

Another vegetable I have never tried but have heard lots about. It is meant to taste a little like cabbage. It is another member of the Brassica family so should like the Irish climate. We have a variety called 'White Stemmed' which it says on the packet should be ready to harvest in 8-10 weeks. I don't think even the most optimistic grower would expect a harvest in Ireland that quickly, especially after such a wet and cold April. 


We sowed 7 seeds in 7 x 2" inch pots in good quality multi-purpose compost and literally just left them outdoors but under a layer of Enviromesh to keep the worst of the weather off them. 


The following picture was taken 3 weeks after sowing and demonstrates the slow growth so far this year.  


Hopefully May will bring a nice increase in temps otherwise I will have to pot these on to larger pots as I don't want to plant them out when they are too young / small.


For succession sowing's we will be doing another batch in early May (6 no), early June (5 no) and early July (5 no). 


I just hope we like it now! 

Allotment - Spring Onion

The first of our Spring Onion seeds were sown last weekend (6th April).


For a continuous crop of Spring Onions hopefully right up to October we will be sowing two small pots (3" - 4") filled with compost every fortnight with the aim to harvest one pot each week from June onwards. Last year the Spring Onions seemed to take an eternity to reach a good size for harvesting but their growing position was probably the worst spot available on the allotment. 


I got the tip to grow them in pots from another gardener whose videos I watch online, it saves space and makes repeating sowing's frequently quite easy. Spring onions do not require much space to grow and I have seen them grown on short lengths of gutter hung from the Polytunnel structure to maximise space usage. 


I filled the pots about 3/4 of the way to the top with multi-purpose compost and compacted it a little, then I scattered a few of the seeds, approx 10-15 on top of each and topped off with another fine layer of compost. The pots are then set aside outdoors but under cover of enviromesh to keep the worst of the wind and rain off them. 


I have the same variety but from two different seed companies, 'White Lisbon' from Suttons and White Lisbon from Mr. Fothergill's. To my mind they should be the same but according to the seed packet they can be sown at different times of the year (Suttons can be sown from March to May and from August to September for an overwintering crop whereas Mr. Fothergill's can be sown from March to July only).


I also have a variety called 'Tokyo Long White' which again has a longer growing season (March to July and September to October) as it can be overwintered. 


I will stagger which variety is sown and compare results later in the year. 

Thursday, 5 April 2012

Allotment - Broad Beans

We bought the Broad Bean seeds last summer planning on sowing them over the winter. Sadly we missed the boat so instead had to wait until this spring to get them started. 


We have 2 varieties of Broad Bean, 'Masterpiece Green Longpod' and 'Red Epicure' but both are sown in the same way. We need to plant out 11 plants of each variety but sowed 15 of each to have a few spares if needed. In small pots filled with compost, make a small hole using dibber, pencil or whatever your weapon of choice is and put a seed into the hole. Top off with a little more compost, water and leave to germinate. 


We sowed these seeds in a propagator tray and covered with the lid but left the tray outdoors. We are hoping that the additional heat will help them germinate quicker but that being outdoors from early on means they will not need hardening off and will be tougher plants. It is almost like a mini cold frame, hopefully. 


There is an additional cover that goes on top of this bed which keeps the worst of the weather off the sowing trays. 

Tuesday, 3 April 2012

Allotment - Joining GIY

I registered to become a member of GIY Ireland late in March and received my membership pack on the 2nd April. 


For those who are unfamiliar with GIY it stands for Grow It Yourself. It is an online resource for anyone and everyone who wants to or already does grow something themselves to eat. It's members range from those with little or no experience to master gardeners. It is a registered charity that was established in 2009, I have been dipping in and out of the website since early 2011 and have noticed in that time the website has gone from strength to strength and has nearly 6,000 members online alone. 


They champion the idea of local GIY groups all over the country, essentially all you have to do is find your nearest group and go along for a meeting or two, learn from the other members and maybe contribute a little something yourself and if you like it stick around. 


Feeling a little more settled and established this year I decided I would like to become more active within the organisation, I noticed they have a membership option which for €35 I chose to take up. We are playing catch up with the UK which has an abundance of magazines, websites and resources dedicated to allotments, kitchen gardens and generally growing your own fruit and vegetable but I think we are starting to row in behind the idea. I was pleasantly surprised when the pack arrived yesterday to find the following inside:
  • GIY Magazine which is packed with information.
  • 7 packets of organic seeds, Carrots, Beetroot, Lettuce, Tomatoes, Peas, Courgette and Parsley. Also incl. were growing guides for the above seeds.
  • GIY Wallchart which included a month x month list of tasks and a growing calendar for the mainstay crops.
  • GIY members card which I believe gets me a 10% discount with participating retailers (I know Woodie's participate so that's all I really - best customer 2011 award goes to me). Additionally the card gets me a 5% discount on the GIY website on goods and also some of the courses they run.
Overall I was fairly pleased with the package, the website is very well run and each day there is a tip of the day to keep me logging back in (a good idea for any website). I have yet to go to a GIY Group meeting but there is one scheduled for the 21st of April so looking forward to that. 

For more info visit http://www.giyireland.com/


Friday, 30 March 2012

Allotment - Shallots

This is our first year attempting to grow shallots so will see how they go. 


You buy shallots in sets similar to onion sets, basically baby shallots. These are planted in rows approx 8-12 inches apart in rows 18 inches apart. We just got enough for a single row of 15 in total. Each shallot set should grow to form approx 4-8 shallots each so we should have plenty assuming they all grow well that is.


We used the same method as with the garlic, made a small hole with a dibber, filled it with compost and pushed the shallot into the compost so that just the tip was visible. Thats pretty much it. Hopefully the compost will provide plenty of organic matter for the set to feed on. 


You have to keep an eye on the shallots in the weeks after planing as the birds seems to quite like to pull them out of the soil thinking they are worms, if you see a shallot has been pulled up, then just pop it back into place. 

Allotment - Parsnips

Parsnips have a reputation as a difficult crop to grow, maybe we were just very lucky last year but we got a very decent crop of Parsnips with what seemed like a simple enough care plan.


Last year I sowed parsnips in 2 different ways. One was the conventional way of sowing thinly approx 1 inch deep into finely prepared soil in rows approx 12 inches apart (Some books advise to double the row distance to 24 inches). 


The other way was to use a dibber to create a conical shaped hole approx 6-8 inches deep to the same spacing as above. These holes are then backfilled with compost and compressed gently. Once all these holes are prepared you can then go back and make a small hole say an inch deep on top of the compost and drop in 1-2 parsnip seeds in each (2 is a good idea as parsnips have a notoriously poor germination record). Backfill the hole a little and job done. 


The results were fairly impressive with the parsnips planted into the compost holes far outgrowing the others. In general the were longer, wider looked generally straighter than the others. 


The major drawback with this method is it is very time consuming at sowing stage. However the results are far better so its definately worth the effort. We decided this year to plant all our parsnips in this way. A big advantage is that when making the initial hole with the dibber you manage to eliminate any stones that could damage the parsnip as it grows.


We have 2 different varieties of parsnip, F1 Countess and White Gem. We did 36 compost holes in all so 18 of each variety. Weed control is very important as parsnips do not like competition. 


Allotment - Garlic

We already have winter sown Garlic in the Ground that was planted Late Nov / Early Dec which should crop in early summer time. 


We are big garlic users in our household so decided to sow a spring planting also. Ideally you would do this Early March time but we only got around to it late March but are hopeful we got them in just on time. 


To sow garlic it couldn't be easier, you usually buy a pack of 3-4 certified garlic bulbs which have around 12 cloves each in them. All you have to do is split each clove apart from the bulb, you need to allow 6-8 inches between cloves in rows approx 18 inches apart (we made our rows a lot closer at approx 8 inches apart) and 2-3 inches deep. Conventionally all you have to do is push the clove into the soil at the above spacing and that's it. 


This is how we planted our winter garlic and they seem to be doing quite well. See image below. 


As an experiment we made a small hole in the soil with a dibber, we then filled this hole with some compost and compressed it slightly. Then we planted a clove of garlic into the compost and covered it so just the top was visible. This is the method with which we sow our carrots and parsnips and I just wanted to give it a go. It is a good way (at least I hope it is) of giving the clove a good start as it has lots of organic matter to feed on. I have not read about others doing this and there may well be a good reason for that but I said I'd give it a go. Only downside to this method is that it is time consuming. 

Allotment - First Early Potatoes

The first vegetable to be sown this year are our First Early Potatoes. We only planted 10 seed potatoes as there is just the two of us we should get a good return. Also early potatoes do not store well so we pretty much have to eat them as they are harvested. This will be the first year for us growing earlies so I am looking forward to seeing how well they do.


We planted these the usual way, dug a small trench about 6-8 inches deep and added some manure and a sprinkling of Blood Fish & Bone, a balanced fertiliser to help them along as Potatoes are a hungry crop. We placed each tuber (sprouting eye facing up) about 12 inches apart in rows approx 24 inches apart. 


Just to help protect them a little from a late frost we added some straw dense manure on top to keep the soil warm, when the plants are poking through the soil we will earth them up on top of the manure which will add additional organic matter to the potatoes. See image below. 


Friday, 30 September 2011

Allotment - Harvest 2011

Looking back on 2011 in the Allotment I wasn't overly happy but on seeing some of the pictures again I don't feel too bad, we did manage a good crop of a lot of vegetables. I felt a little disappointed in the returns overall but that was down to my own mistakes as much as anything else. Not protecting vegetables from pests was a major faux pas that we wont be repeating in 2012. 


Below are some pictures of the harvests from last year. 


Digging up the first of the Main Crop Potatoes. 


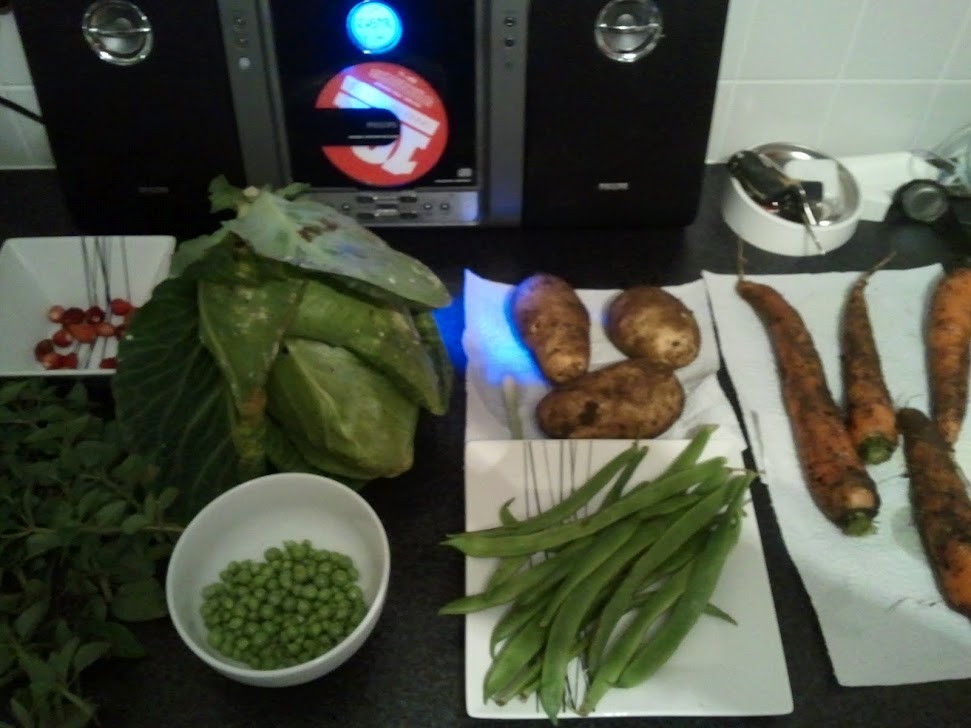
A good selection of veggies for dinner. Left to right from picture, some Alpine Strawberries, Butterhead and Cos Lettuce, Peas, Potatoes, Runner Beans, Carrots


After we harvested all our Main Crop Potatoes, we set them on some newspaper in the apartment to dry before placing them in a large plastic container to exclude light, we left the lid slightly ajar so the air could circulate . They stored in this manner until Just after Christmas when all we were left with were the small potatoes we were too lazy all along to peal. It does not look like many in the picture but for our needs they were ideal. 


Some of the carrots harvested, we generally harvested them as we needed them until October when I lifted them all, cleaned, peeled and froze them for later use.

The first Turnips were harvested in early July. These ones are a variety called 'Purple Top Milan' and were harvested a little bigger than tennis ball size. The Turnips following on from these suffered from a lot of pest damage due to not being covered during their growing season. Also in the tray was some Rocket. We were not short on Rocket for our salads during 2011 at least, it grew quicker than we could harvest it. That said we did plant about 10 plants so we were knee deep in Rocket before long. It really is a prolific cropper.